Fall Detection App: Algorithm, Model Testing and Conversion for Android
Testing fall detection model with real-life data and conversion of sklearn model to Android-compatible structure
The previous post used the data to create machine-learning models for fall detection.
Random forest obtained an overall accuracy of 90.58%, with precision for the falls 79% and a sensitivity of 89% on the validation data.
SVM obtained overall accuracy of 90.42%, with precision for the falls at 77% and a sensitivity of 92% on the validation data.
Real-life data
Volunteers created the dataset with almost 300 h of accelerometer readings with the custom sensor app, SensorBox. We lived our daily lives, so we went to school, work, gym, etc.
To get a glimpse of how we created all the data, go check out my previous article: Data creation article
The Fall Detection Algorithm
The algorithm needs to be lightweight, real-time and prone to false positives.
- The first step is simple we need to look for acceleration higher than 3g. The magnitude of the signal is calculated from the 3D acceleration and compared to 3g.
- If the value crosses the 3g threshold, the algorithm waits for the next 0.75s.
- If the following values after 0.75s to 5s contain acceleration above 3g, the previous steps are repeated.
- If nothing happens, the signal is cropped and forwarded for further inspection by a machine-learning model
- Next, the algorithm checks another two conditions:
- check if the activity after the event is below 1.1g — empirically calculated average of acceleration from a dataset of falls
- check if there is part of magnitude below 0.2g with a length more than 50ms (phone fell on the ground)— not needed if the proximity sensor is active
- if the conditions are correct, the ML model processes the indicated signal and classifies it.
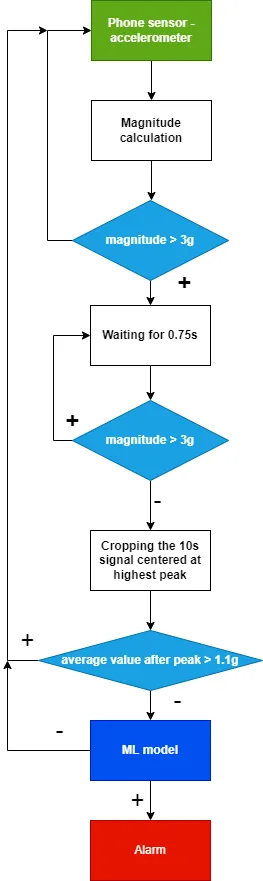
Diagram for the algorithm
Empirically calculated parameters also could be optimized with larger dataset.
Testing the algorithm
Before real-life implementation, the algorithm was tested in a controlled environment with Python implementation. The steps mentioned above are replicated in Python and launched on real-life data.
Unfortunately, the data do not contain any real-life fall.
time = acceleration.modified[Consts.TIME_SECONDS]  # numpy array of time samples in seconds
magnitude = acceleration.modified[Consts.MAGNITUDE]  # numpy array of magnitude samples from acceleration

time_total = time[-1]  # to aggregate total time of recordings
parameters_real_life = []  # to stack parameters
last_detection = 0
detection = False

# to simulate real-time accelerometer - iterating through whole signal
for index, (t, value) in enumerate(zip(time, magnitude)):
    if value > 30 and not detection:  # searching for high acceleration
        detection = True
        last_detection = t
        continue
    if detection and np.abs(t - last_detection) <= 0.75:  # let fall proceed
        continue
    if detection and np.abs(t - last_detection) > 0.75 and value > 30:  # if new peak id detected - delete indication
        detection = True
        last_detection = t
        continue
    if detection and np.abs(t - last_detection) >= 5:  # after 5 seconds from indication
        # get specific window for inspection
        # index of the beginning, cropped timestamps, magnitude samples, 3D acceleration samples
        index_begin, time_10, magnitude_10, acg_xyz_10 = get_ten_seconds(index, time, magnitude, acceleration.data)
        # calculates needed indexes like peak index, end index, etc
        event_of_interest: EventOfInterest = get_event_of_interest(time_10, magnitude_10) # pick array around

        # check if something went wrong
        if len(magnitude_10[event_of_interest.end_index:]) == 0:
            detection = False
            continue
        # activity check
        activity = np.sum(magnitude_10[event_of_interest.end_index:]) / len(magnitude_10[event_of_interest.end_index:])

        if activity < 11 and not is_fall_of_phone(time_10, magnitude_10, event_of_interest):  # checking activity after fall and freefall
            try:
                result = calculate_acg_parameters(time_10, magnitude_10, acg_xyz_10, event_of_interest)
                if result is not None:
                    parameters_real_life.append(result)
            except Exception:
                traceback.print_exc()

        detection = False
if len(parameters_real_life) < 2:
    if len(parameters_real_life) == 0:
       return time_total, None
    else:
       return time_total, np.array(parameters_real_life)

# getting the matrix of paramters, which can be passed to model at once
return time_total, np.vstack(parameters_real_life)
Results of the testing
The algorithm can find 4281 potential falls in 297 hours of accelerometer signal.
Keep in mind, that volunteers were young people going to the gym and living an active life. Some exercises in the gym resemble the fall. Unfortunately, notes about activities were not captured.
Random forest: 48 / 4281 false positive detections, what is 1.12%
SVM: 83 / 4281 false positive detections, what is 1.94%
Here, the random forest is the clear winner because it has a lower false positive rate and higher accuracy than the SVM algorithm.
Converting sklearn model into the Java model
Deprecated way I did it in the past
Conversion to the sklearn model to java is straightforward with the following library: sklearn-porter
Android uses mainly Kotlin nowadays, so the Java code is fully compatible too. We can transform the Python model into the Java model and use it in our future Android app.
The SVM algorithm resulted in the 94 kB model. Meanwhile, RandomForest in 580 kB model. They do not differ in precision from the Python version. The size of the models is related to the way how they work. The random forest needs to store whole trees to predict the result. The SVM stores only support vectors and use them to calculate prediction.
However, I noticed that the library is not maintained well and uses outdated sklearn version. So I searched for the alternative.
The other way to achieve it
If I did it today, I would transform the sklearn model into the ONNX model via sklearn-onnx converter: sklearn-onnx
The final model I would implement via ONNX runtime Android library: ONNX Runtime
In the next post, we will look at the Android app. Follow me, so you do not miss the next posts!


