Dependency injection with Hilt in Android development
The hilt is a dependency injection (DI) framework based on Dagger. So, anyone who used Dagger in the past will have an easy time learning to use Hilt for Android development.

Photo by Alina Grubnyak on Unsplash
For an introduction to DI and other concepts, I recommend reading my previous article about it here.
The primary purpose of Hilt, Dagger, Koin and other DI frameworks is to do the heavy lifting of manual DI for you. If you do not use one, you will have to resolve all the dependencies on your own. It can get tedious and fragile if the complexity of the project grows. The dependencies are determined during the compilation time. If something is wrong, you will know about it before the run time of the actual app. The dependency frameworks can even help you with testing by placing the correct mock or fake in the right place for a unit or UI test.
If the DI framework is implemented, it tries to figure out how all the classes are interdependent and if the proposed solution makes sense. It tries to create a graph which provides necessary dependencies to appropriate classes. If there is something wrong, the error will occur during the compilation. It is a benefit of the DI framework as the error can be fixed before releasing the app to other people, where it would occur during runtime and crash the app.
Set-Up
The current version of the Hilt can be found here.
For the project-level build.gradle put this inside:
plugins {
  id 'com.google.dagger.hilt.android' version '2.46.1' apply false
}

For the app-level  `build.gradle`  put this inside respectively to sections:

plugins {
  // other plugins - order is important
  id 'kotlin-kapt'
  id 'com.google.dagger.hilt.android'
}

android {
  compileOptions {
    sourceCompatibility JavaVersion.VERSION_1_8
    targetCompatibility JavaVersion.VERSION_1_8
  }
}

dependencies {
  // For hilt Implementation
  implementation 'com.google.dagger:hilt-android:2.46.1'
  kapt 'com.google.dagger:hilt-compiler:2.46.1'

  // For instrumentation tests
  androidTestImplementation "com.google.dagger:hilt-android-testing:2.46.1"
  kaptAndroidTest "com.google.dagger:hilt-android-compiler:2.46.1"

  // For local unit tests
  testImplementation 'com.google.dagger:hilt-android-testing:2.46.1'
  kaptTest 'com.google.dagger:hilt-compiler:2.46.1'
}

kapt {
  correctErrorTypes true
}
Every app must contain a class, which inherits the Application Android class, which is annotated by @HiltAndroidApp . This class is used by Hilt’s code generator, which makes all the components lifecycle aware.
For example, create MyApp.kt and add:
@HiltAndroidApp
class MyApp: Application()
From this point, the Hilt is fully integrated into our app and we can start using it for DI.
Constructor and Field Injection
If the dependency is passed to the class, it can be done in two ways. With constructor and field injection.
Constructor injection
The constructor injection is shown in the following code sample, where the Preferences is passed to the AppSettings class.
/// abstraction of any preferences
interface Preferences { ... }

/// specified class of preferences with underlaying functions
/// the @Inject annotation is needed, because the hilt sees only classes with annotation
class PreferencesImp @Inject constructor(): Preferences { ... }

/// app settings, which can receive the preferences via DI
class AppSettings @Inject constructor(private val preferences: Preferences)
All of the code seems as usual from the Kotlin perspective. The class contains constructor preferences input, which becomes the field of the class. A class instance is directly passed to the class’s constructor to create a new instance. This is called constructor injection. The @Inject keyword comes from the Hilt, which enables the framework to find this constructor and inject it with appropriate class instances, which will be covered later.
The benefit of the constructor injection is that it can be bypassed anytime by manual DI. You can recreate the class during runtime and ignore the DI framework, which can be useful during the testing if you want to create the class in an isolated environment.
Field injection — Android classes
The field injection is handy during class inheritance, which we do not possess from Android like Activity, Service, Fragment, View and others.
@AndroidEntryPoint // it labels the class for hilt, that is should look into it
class MainActivity : AppCompatActivity() {

  @Inject
  lateinit var appSettings: AppSettings

}
The Android activity is initialized within the system, but Hilt can provide all necessary dependencies. The control of the injection is lost due to the DI framework. It can be done only with its initialisation too.
The field injection can be done by the @Inject keyword, which lets the Hilt fill the required field with the proper class instance.
Now we know what is field injection and constructor injection. But, how does Hilt know where the dependency comes from? How do we define, which dependency will go where? The answer is Hilt modules and bindings.
Hilt modules
The modules are sources of the required class instances for classes which depend on them. Sometimes, you miss ownership of the class, or the third party library gives you an interface to inherit, but no specific implementation, or the creation of the instance does not have an empty constructor. The modules create space for objects to construct instances and pass them to Hilt to figure out where to put them without much of the code. There are two variants: module and binding.
Do not forget to generalise you classes into abstract classes or interfaces, so you can mock classes or freely interchange multiple instances of the same class — so called inversion of control. See the linked article to learn more about it here.
Provides
The Provides is more straightforward to use for the first time if you use Hilt and you can get all of the work done within the Module. Let’s start with the example:
@Module // creation of hilt module
// components and scopes will be described later
@InstallIn(SingletonComponent::class)
object PreferencesDI { // kotlin object is needed

  // dependencies, which we own
  @Provides
  fun providePreferences(@ApplicationContext context: Context): Preferences {
    return PreferencesImp(context)
  }

  // third party database
  @Provides
  fun provideDatabase(@ApplicationContext context: Context): Database {
    return DatabaseImp(context)
  }

}
The module is constructed from @module annotation, which symbolises the module itself. The InstallIn(...) decides about when the dependencies are initialized. It will be described in the next part of the article.
Kotlin object then contains all the functions with annotation @Provides , which resolves the needed instances. The code sample demonstrates the process, which provides the Preferences as a generalised class with a specific implementation of PreferencesImp .
With the definition of the module Hilt knows, if the class @Inject needs the Preferences , it knows it should go here into this module and grab a new instance of it.
The modules are suitable for all of the third parties solutions as they can provide any class, which is accessible to the project. The project does not need to own whole dependency.
Need of Android Context ? Pass the input of the function with the @ApplicationContext as-in code sample below. In the same way, you can pass other dependencies from the application, which come from other modules.
@Provides
fun provideAppSettings(@ApplicationContext context: Context,
                                           prefrences: Preferences): Preferences {
  return AppSettings(context, preferences)
}
Binds
@Binds has more limited usage and is a bit less intuitive, but brings some advantages over the @Provides like less code to define it and more efficiency during the compilation of the code = faster build times.
The @Binds is used with abstract classes and interfaces as an output type of abstract function, which takes in input in a required instance.
@Module
@InstallIn(SingletonComponent::class)
abstract class PreferencesDi { // abstract class with abstract function

    @Binds // the implementation is passed as input with expected interface as output
    abstract fun providePreferences(preference: PreferencesImp): Preferences

}
With this sample of code, the result is the same with the @Provides. That is why if you build some simple small application, the usage of either the @Provides or @Binds is not that decisive.
If you own the implementation or you have interface, which cannot use constructor injection, go with
@Binds. Otherwise, pick the@Module.
Android components and scopes
Component lifetime
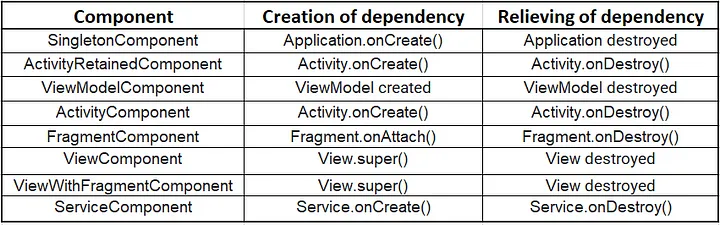
Component lifetime is determined by the @InstallIn keyword from the Hilt. It declares at which point the dependency will become available in the app.
You can imagine it as layers activated in the queue and how the app becomes alive. If the app is started, all the singletons in SingletonComponent are initialized. If the activity is created, all the components installed in the ActivityComponent are initialized. Components activated sooner are available to other components but not vice versa. If the dependency is initialized, it is initialized with new instances of needed dependencies. The order in which the dependencies are initialized is in the table below.
Lay down the modules so that the dependencies will become available only if they are needed. There is no need to install everything into a singleton component. It will increase robustness of the solution and speed of the app.
Component Scope
As it was mentioned, if the class is constructed at the component, it gets new instances of all dependencies. This means every component is unscoped by default.
To change that, you can add scopes to every module in the following way.
@Module
@InstallIn(SingletonComponent::class)
object PreferencesDI {

  @Provides
  @Singleton // declares scoped singleton
  fun providePreferences(): Preferences {
    return PreferencesImp()
  }
}
Scoping the dependencies means creating one instance of the dependency and passing it to all the classes requiring it. The instance is relieved with the component, to which it is scoped. So, if we want to make preferences shared across the app, we can declare singleton scope on top of the method, which provides it. Scoping annotations can be found below.

Scoping is expensive and should be avoided, if it is possible, because it takes memory by preserving all the instances. Mainly Singleton statements should be avoided as they stay for full existence of the app.
Full example in Jetpack compose
Setup
Firstly, the project needs to contain the required dependencies at the beginning of the article.
Secondly, create class which inherits the Application class and adds the @HiltAndroidApp . Here is one example:
@HiltAndroidApp
class AppHiltExample : Application()
After initialisation of the Hilt, if the main activity interacts with ViewModels or any other registered components — add the @AndroidEntryPoint at top of the Activity.
@AndroidEntryPoint
@ExperimentalAnimationApi
class MainActivity : ComponentActivity() {

    override fun onCreate(savedInstanceState: Bundle?) {
        super.onCreate(savedInstanceState)
        setContent {
            val vm: IntroViewModel = hiltViewModel()
            val isOnboardedState = vm.isOnboarded.collectAsState()
            MainCompose(isOnboardedState = isOnboardedState.value)
        }
    }
}
If this tag is missing, you can get error which describes that some ViewModel was called with empty constructor, even if there are some input variables required.
HiltViewModel in the Jetpack Compose can be instantiated via factory
hiltViewModel(). If you define type of the value, the Hilt will give the instance, which you need. The best practise is to decouple the actual composables from the ViewModels as it is done in example. The composable should take only current state object on which it depends, not whole ViewModel.
App introduction
Let’s have a look at what we are going to build. It is a simple app with a serial introduction launched at the first start. After the intro, the user can use the app and can be navigated via the navigation drawer. On the home screen, there is a button, which will open the empty mail.
The workflow is orchestrated by the AppViewModel, which will navigate the user if he finishes the onboarding.
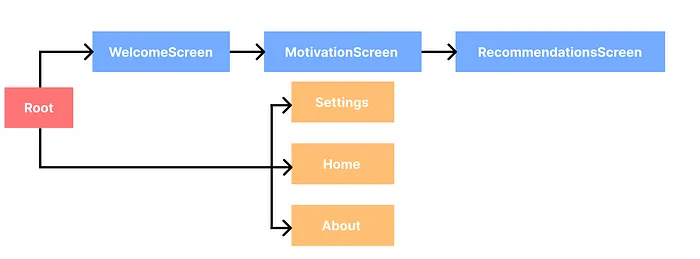
Navigation in the sample app
ViewModel definition
@HiltViewModel
class AppViewModel @Inject constructor(
    private val settingsRepo: SettingsRepo, private val mailClient: MailClient
) : ViewModel() {

    private val _isOnboarded: MutableStateFlow<AppState> = MutableStateFlow(AppState.NotOnboarded)
    var isOnboarded = _isOnboarded.asStateFlow()

    init {
        _isOnboarded.value =
            if (settingsRepo.isOnboarded()) AppState.Onboarded else AppState.NotOnboarded
    }

    fun onEvent(appEvent: AppEvent) = when (appEvent) {
        AppEvent.FinishOnboarding -> saveUserOnboarding()
        AppEvent.SendMail -> sendMail()
    }

    private fun saveUserOnboarding() {
        _isOnboarded.value = AppState.Onboarded
        settingsRepo.saveOnboardingState(true)
    }

    private fun sendMail() = mailClient.sendMail()

}
Hilt comes with special annotation for the ViewModels @HiltViewModel, which makes handling ViewModels easy. The ViewModel contains one state, which holds information about the state of onboarding. The state can be loaded in from app settings or changed via its method. Based on the state, the app changes the navigation graph. Moreover, it contains mail client, which will open your mail on the phone.
If you are interested in nested navigation in JetPack Compose, read my other article here
Defining the dependency
Firstly, the Settings and Mail client repository areabstracted by the interface.
// template for behaviour of the settings
interface SettingsRepo {
    fun isOnboarded(): Boolean
    fun saveOnboardingState(isOnboarded: Boolean)
}

// template to send mail
interface MailClient  {
    fun sendMail()
}
Secondly, let’s define implementation for such settings and mail client in the app. For tutorial sake, the example is rather simpler. In a real implementation, the app would contain a proper database, shared preferences and user real mail information, but now the app will work only with variable.
// do not forget to add @Inject. Otherwise the Hilt will miss this dependency in @Binds
class SettingsRepoImp @Inject constructor(): SettingsRepo {

    // rest of the simple implementation to change the onboarding state
    private var isOnboardedParam: Boolean = false

    override fun isOnboarded(): Boolean = isOnboardedParam

    override fun saveOnboardingState(isOnboarded: Boolean) {
        Log.i(TAG, "saveOnboardingState: $isOnboarded")
        isOnboardedParam = isOnboarded
    }

    companion object {
        const val TAG = "SettingsRepoImp"
    }
}

// this dependency requires context, so the app will use @Provides and @Inject is not needed
class MailClientImp constructor(private val context: Context): MailClient {

    override fun sendMail() {
        Intent(Intent.ACTION_SENDTO).also {
            it.data = Uri.parse("mailto:")
            it.flags = Intent.FLAG_ACTIVITY_NEW_TASK
            context.startActivity(it)
        }
    }

}
Thirdly, let’s define the module to provide our app settings. The app has ownership of the class, so the Binds annotation is the right way to go. The app needs to create a module, which is installed into the ViewModel component, as it is enough that the settings are available for the ViewModel. They would be redundant sooner.
@Module
@InstallIn(ViewModelComponent::class) // the dependencies are passed to viewmodel
abstract class SettingsDi {

    @Binds // passing implementation of the class, which inherits the interface
    abstract fun provideAppSettings(appSettings: SettingsRepoImp): SettingsRepo

}

@Module
@InstallIn(ViewModelComponent::class)
object MailDi {

    @Provides // the instance needs to be initialized by providing context
    fun provideEmailClient(@ApplicationContext context: Context): MailClient =
        MailClientImp(context)

}
If everything has been done right, you can click build and the app should run. The onboarding should can be passed and afterwards, the home screen is shown with the button and drawer.
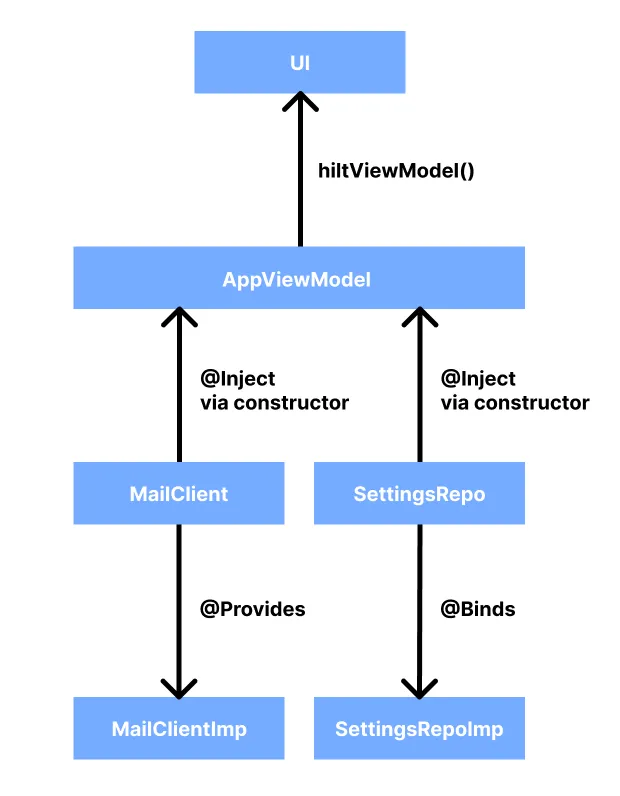
The advantage is that the UI is fully decoupled from the implementation and the ViewModel does not now specifically, what is hidden under the repositories. So changes in the repositories, will not influence the ViewModel and UI. Moreover, unit testing of the structure is now much more simple.
Here is wrap-up, of what is happening from Hilt’s perspective.
For the full code, go here
Resources
Developer Android documentation


